Run AI models locally for privacy and full control

Every AI request you send to a cloud service is a data point someone else owns. For macOS developers and power users who care about what happens to their prompts, context, and outputs, that’s a real problem. Running AI models locally flips the equation: your hardware does the work, your data never leaves the machine, and you get deterministic, low-latency responses without subscription throttling or API rate limits. This guide walks you through the exact requirements, setup steps, troubleshooting methods, and verification techniques you need to deploy local AI models on macOS with confidence.
Table of Contents
- What you need to run AI models locally
- Step-by-step guide: Running your first local AI model
- Troubleshooting and optimizing local AI performance
- Verifying results: Assessing accuracy and privacy
- A developer’s perspective: Rethinking AI deployment on macOS
- Next steps: Integrate advanced local AI with MingLLM
- Frequently asked questions
Key Takeaways
| Point | Details |
|---|---|
| Privacy boost | Running AI models locally keeps your data on your device, reducing privacy risks. |
| MacOS compatibility | Careful selection of frameworks and datasets ensures smooth integration with your system. |
| Performance matters | Optimizing hardware and preprocessing data directly impacts the speed and accuracy of your local AI models. |
| Verification steps | Always validate your model’s performance and privacy status after deployment. |
| MingLLM advantage | Solutions like MingLLM further enhance personal AI capabilities and privacy on macOS. |
What you need to run AI models locally
Now that you understand the benefits, let’s start by gathering what you’ll need to get started.
Hardware requirements
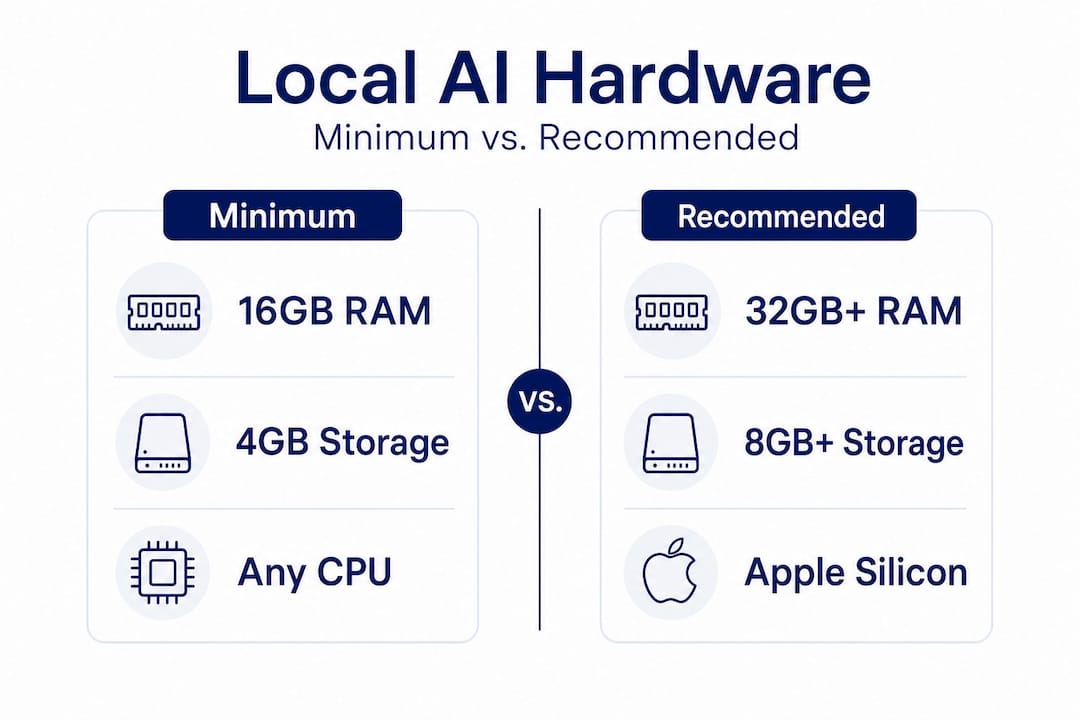
The bare minimum for running a useful language or vision model locally is 16GB of unified memory. If you’re on Apple Silicon (M1, M2, M3, or later), that unified memory architecture is a genuine advantage because it lets the CPU and GPU share the same memory pool, which eliminates the bottlenecks you’d see on traditional systems. For larger models with billions of parameters, 32GB or 64GB is a practical target.
Your CPU matters less than you might think for inference, but it matters a lot for compilation and tokenization pipelines. Apple Silicon chips handle both well. For GPU acceleration, Metal Performance Shaders (MPS) is the native path on macOS, and most modern frameworks now support it. If you’re on an older Intel Mac, expect slower inference and consider starting with smaller, quantized models.
Storage is often overlooked. A 7 billion parameter model in 4-bit quantization takes roughly 4GB on disk. A 13 billion parameter model at the same quantization takes around 8GB. Plan for at least 50GB of free SSD space if you want to experiment with multiple models simultaneously.
Software and frameworks
The most developer-friendly options on macOS right now are:
- PyTorch with MPS backend support (version 2.x and later)
- TensorFlow with macOS-specific Metal plugin
- llama.cpp for pure C++ inference with excellent Apple Silicon optimization
- Ollama for a streamlined local model server with a clean CLI
- MingLLM for integrated voice, browser, and workflow automation on top of local models
You’ll also want Homebrew, Xcode Command Line Tools, Python 3.10 or later, and a virtual environment manager like "condaorvenv`. Check your macOS version first: most frameworks targeting Metal require macOS 12.3 Monterey or later, and some features need macOS 13 or 14.
The role of datasets
Even if you’re only doing inference with pre-trained models, understanding your dataset matters. Fine-tuning or running retrieval-augmented generation (RAG) pipelines requires clean, well-structured data. Quality datasets are vital for robust AI training and performance, and this holds true whether you’re training from scratch or adapting a pre-trained checkpoint to your specific domain.

| Requirement | Minimum | Recommended |
|---|---|---|
| Unified memory (Apple Silicon) | 16GB | 32GB or more |
| Storage (free SSD) | 20GB | 50GB or more |
| macOS version | 12.3 Monterey | 13 Ventura or later |
| Python version | 3.10 | 3.11 or 3.12 |
| GPU API | Metal (MPS) | Metal with latest drivers |
Step-by-step guide: Running your first local AI model
With the prerequisites in place, follow these steps to deploy your own AI model locally.
Step 1: Verify dependencies and OS version
Open Terminal and run sw_vers to confirm your macOS version. Then install Xcode Command Line Tools with xcode-select --install if you haven’t already. Install Homebrew if it’s not present, then run brew install python@3.11 to get a clean Python installation.
Step 2: Set up a virtual environment
python3.11 -m venv ~/local-ai-env
source ~/local-ai-env/bin/activate
This isolates your project dependencies from the system Python and prevents the library conflicts that are the number one cause of failed setups on macOS.
Step 3: Install your chosen framework
For PyTorch with MPS support:
pip install torch torchvision torchaudio
For Ollama, the fastest path to a working local model server:
brew install ollama
ollama serve
Step 4: Download a pre-trained model
Using Ollama, pulling a model is one command:
ollama pull llama3
For a more controlled setup with Hugging Face models, use the transformers library and download directly to a local directory:
pip install transformers
Then in Python: from transformers import AutoModelForCausalLM, AutoTokenizer
Step 5: Run inference and integrate into your workflow
- Start the model server or load the model in your script
- Send a prompt and capture the output
- Parse and route the output to your macOS app or workflow
- Use AppleScript or Shortcuts to trigger actions from model output
- Log responses locally for review and iteration
Using large-scale datasets in local projects can significantly improve model reliability when you’re fine-tuning or building RAG pipelines on top of these foundations.
| Framework | MPS support | Ease of setup | Best for |
|---|---|---|---|
| PyTorch (2.x) | Yes | Moderate | Custom model development |
| llama.cpp | Yes (via Metal) | Moderate | Low-latency inference |
| Ollama | Yes | Easy | Quick model serving |
| TensorFlow | Partial | Complex | Research and training |
| MingLLM | Yes | Easy | Integrated macOS workflows |
Pro Tip: Run python -c "import torch; print(torch.backends.mps.is_available())" right after installing PyTorch. If it returns True, Metal acceleration is working. If it returns False, your macOS version is too old or the package was installed incorrectly.
Troubleshooting and optimizing local AI performance
After setup, you may encounter some hiccups or performance bottlenecks. Here’s how to handle them.
Fixing library conflicts and dependency issues
The most common failure mode is a version mismatch between your framework and your Python interpreter. Always create a fresh virtual environment per project. Use pip list to audit what’s installed, and pin your dependencies in a requirements.txt file. If you see errors related to libiomp or libomp on macOS, the fix is usually:
brew install libomp
For Metal-related crashes, confirm you’re using the MPS-compatible version of your framework, not the CUDA-only release intended for Linux or Windows.
Data pre-processing best practices
Before feeding data into a local model for fine-tuning or RAG:
- Normalize text encoding: convert everything to UTF-8 and strip invisible characters
- Remove duplicates: duplicate training samples inflate perceived performance without adding real generalization
- Tokenize consistently: use the same tokenizer at both training and inference time
- Validate schema: for structured data, enforce consistent key naming and data types before ingestion
- Split correctly: maintain strict train/validation/test splits to get honest accuracy metrics
Thorough AI data pre-processing genuinely boosts model accuracy and performance for local AI operations, and skipping it is the most common reason fine-tuned models underperform expectations.
Managing hardware resource constraints
“Running large models on consumer hardware is about playing to your hardware’s strengths, not pretending you have a data center. Quantization, batching, and context window management are not workarounds — they are the actual craft.”
Practical options for staying within your hardware budget:
- Use 4-bit or 8-bit quantization to reduce memory footprint by 50-75% with modest accuracy loss
- Keep your context window to what the task actually needs: a 4096-token context uses significantly more memory than a 512-token context
- Run models headless (without a GUI wrapper) to free up RAM for inference
- Close memory-intensive apps like browsers with many tabs before running large models
Pro Tip: On Apple Silicon Macs, open Activity Monitor and watch the “Memory Pressure” graph while running inference. If it goes orange or red, you’re hitting swap, which will cause inference to slow down dramatically. The fix is a smaller model or more aggressive quantization, not faster code.
Optimization tips for speed and accuracy
- Enable MPS device in PyTorch with
device = torch.device("mps")and move your model with.to(device) - Use streaming output for long generations so the user sees results progressively
- Batch similar queries together if you’re running non-interactive workloads
- Profile with
torch.profilerto find the actual bottleneck before optimizing blindly
Verifying results: Assessing accuracy and privacy
Once your model is running, it’s critical to ensure it’s both accurate and truly local.
Testing model accuracy locally
Don’t trust a model because it sounds confident. Build a small evaluation set of 50 to 100 representative examples with known correct answers, then measure:
- Exact match rate: what percentage of outputs match the expected answer exactly
- Semantic similarity: for open-ended tasks, use a simple embedding-based similarity score
- Error categorization: group wrong answers by failure type to identify systematic weaknesses
The dataset impact for AI on model reliability is foundational, especially for evaluating local deployments. A model trained or fine-tuned on low-quality data will fail on your evaluation set in ways that are hard to debug, because the patterns simply weren’t in the training distribution.
Verifying privacy: No remote calls or logs
This is where local AI earns its value, and you need to verify it, not assume it.
- Run
sudo lsof -ior use Little Snitch to monitor outbound network connections while the model is active - Check your framework settings: some libraries have optional telemetry enabled by default. PyTorch has it; disable it with
torch.utils.telemetry.enable_telemetry(False)in your startup script - Verify that model weights are stored and loaded from local paths, not fetched from a remote CDN at runtime
- Use Wireshark on the loopback interface to confirm all inference traffic stays local
Practical verification checklist:
- No outbound HTTPS calls during inference
- Model weights load from local filesystem paths
- No background threads phoning home after initialization
- Logs stored only in user-specified local directories
- Framework telemetry explicitly disabled in config
Simple validation techniques
For a quick sanity check on a new model setup, create a deterministic test: send an identical prompt three times and compare outputs. With temperature set to zero, you should get identical responses each time. If you don’t, your inference loop has a bug. For non-deterministic tasks, run the same prompt 10 times and check that outputs are semantically consistent even if not word-for-word identical.
A developer’s perspective: Rethinking AI deployment on macOS
There’s a pattern that repeats itself in developer tooling every decade or so. A new capability starts in the cloud because that’s where the compute is. Developers adopt it, accept the tradeoffs, build dependencies, and then gradually realize those dependencies have become vulnerabilities. Local AI is following the same arc, but faster, because Apple Silicon changed the hardware calculus in a way that few people fully anticipated.
The honest lesson from working with local models on macOS is that the speed and privacy gains are real, but they aren’t free. You earn them by understanding your hardware, managing your dependencies carefully, and accepting that some tasks genuinely still belong in the cloud. A local model doesn’t have internet access by default. It can’t search live data or query APIs without you building that plumbing explicitly. For many workflows, that constraint is actually a feature because it forces you to be intentional about what information the model sees.
The unexpected upside most developers don’t mention is control over versioning. Cloud API models change without warning. A prompt that worked in January might produce different output in March because the provider silently updated the model. Local models are pinned. The same weights produce the same outputs indefinitely, which matters enormously for reproducible workflows and auditable systems.
Where cloud-based AI still earns its place is in tasks that require very large context windows, real-time web access, or model capabilities that simply don’t fit in 64GB of RAM yet. That’s a real constraint. But it’s a shrinking one, and the developers who build fluency with local deployment now will be better positioned as the hardware continues to improve.
The practical wisdom is this: start with inference only, use quantized models, verify privacy with network monitoring tools, and add complexity incrementally. Don’t try to replicate a cloud architecture locally. Build something leaner that takes advantage of what local actually means: no latency from network round trips, no data sharing, and full control over the execution environment.
Next steps: Integrate advanced local AI with MingLLM
You’ve got the foundation for running AI models locally on macOS. Now imagine layering on voice interaction, a browser side-panel that synthesizes your open tabs, and a system-wide command interface that routes AI output directly into native macOS apps, all running on your own hardware with no data leaving your device.
Try MingLLM locally to experience how a purpose-built local AI platform handles the integration layer for you. MingLLM combines the privacy and control of local execution with seamless macOS workflow automation, detailed action logs, and proof traces so you always know exactly what the model did and why. If you’re ready to move beyond running a single model in Terminal and into a genuinely integrated personal AI environment, MingLLM is built for exactly that.
Frequently asked questions
What are the main benefits of running AI models locally?
Local execution offers enhanced privacy, faster processing, and eliminates reliance on third-party clouds. Executing AI models on personal devices gives tech-savvy users full control over their data and inference environment.
How much hardware power do I need to run a typical AI model on macOS?
Most useful models require at least 16GB RAM, a recent CPU with Apple Silicon preferred, and optional Metal GPU acceleration for faster inference performance.
Can I use publicly available datasets for local AI training?
Yes. Quality datasets are vital for robust AI training and performance, and many well-structured public datasets are available for download from repositories like Hugging Face.
How do I know if my AI model is actually running locally and not sending data to the cloud?
Check system activity logs and network monitoring tools like Little Snitch for outbound connections, and verify your framework settings to disable any telemetry or remote fetching that may be enabled by default.
What can I do if my local AI model is slow or inaccurate?
Pre-processing your data and applying quantization techniques can improve both speed and accuracy for local AI models running on Apple Silicon.